• Home
  • Hops
    • DIY Projects
    • Dry Hop
    • Grow Hops
    • Videos
  • Grain
    • DIY Projects
    • Dog Treats!
    • Toasted Oats
    • Weigh And Mill Grain
    • Videos
  • Yeast
    • DIY Projects
    • The Life Cycle of Yeast
    • Harvesting, Rinsing and Re-Pitching
    • Videos
  • Water
    • DIY Projects
    • Ward Labs Water Report
  • Process
    • Brewing Guides
  • Equipment
    • DIY Projects
    • Homebrewer's Guide to Plastics
    • Store Hops And Specialty Grains
    • Organize Keg Supplies
  • Polls
  • Lists
  • Charts
  • Creative
  • Favorite Things
  • Coming Soon
  • Contact Us
  • Home
  • Hops
    • DIY Projects
    • Dry Hop
    • Grow Hops
    • Videos
  • Grain
    • DIY Projects
    • Dog Treats!
    • Toasted Oats
    • Weigh And Mill Grain
    • Videos
  • Yeast
    • DIY Projects
    • The Life Cycle of Yeast
    • Harvesting, Rinsing and Re-Pitching
    • Videos
  • Water
    • DIY Projects
    • Ward Labs Water Report
  • Process
    • Brewing Guides
  • Equipment
    • DIY Projects
    • Homebrewer's Guide to Plastics
    • Store Hops And Specialty Grains
    • Organize Keg Supplies
  • Polls
  • Lists
  • Charts
  • Creative
  • Favorite Things
  • Coming Soon
  • Contact Us
   BrewGeeks

Sniffing Airlocks since 2010

Carbonating Beer With CO2

3/26/2013

2 Comments

 
Picture
There are a few different ways to carbonate beer in a keg and a number of factors to consider. How quickly does it need to be carbonated? Is the beer warm or cold? Let's first decide how carbonated we want our beer, then we can choose the best way to set up the equipment. 

The amount of CO2 in beer is measured by volumes and can vary slightly depending on the style. Around 2.5 volumes is pretty typical for most styles in the United States. Here's a chart that correlates beer temperature and PSI to help us out. You can see by the graphic that setting the regulator to 10 PSI with the beer temperature at 38°F will put it at 2.38 volumes.

The next term to understand is equilibrium (sorry for the geek speak). This represents the minimum amount of pressure that is needed to maintain the gas disolved in the beer. In our example above, it usually takes about a week until the beer has reached this point. If the beer is warm, it will take longer for the CO2 to disolve at the same PSI.

With these things in mind, there are two typical ways that homebrewers carbonate using CO2.

Slow "Forced" Carbonating

The first method, sometimes called "set and forget it", basically means that gas is slowly injected at whatever temperature and PSI you have set. Once equilibrium is reached, no more gas can be absorbed unless the PSI is increased or the temperature changes.

Here are a few common scenarios:
  • 65°F (warm) at 27 PSI for about 10 days to hit 2.4 volumes.
  • 37°F (cold) at 10 PSI for about 10 days to hit 2.4 volumes.
  • 37°F (cold) at 35 PSI for 2-3 days to hit 2.4 volumes.

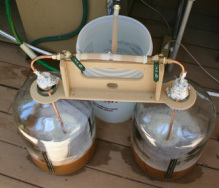
This last example is our preferred method of carbing. We use a small 5lb tank that easily fits in the keezer with the kegs. This is the fastest "non-shake" method of carbonating that we've found and it's nice because this extra time puts a little more age on the beer.

Note that all connections must have tightened hose clamps or the tank will be empty in no time!

Fast "Forced" Carbonating

Although a bit less predictable, the other way to carbonate with CO2 involves shaking the keg while gas enters the beer and there are two schools of thought on this. 

Some people shake with the gas line facing up (liquid side toward the floor) for fear of getting beer in the gas line. They typically set the regulator to 25-30 psi, connect the gas line to the cold keg, lay it flat to create the most surface area, then roll and shake the keg gently for about 20 minutes. Allow the keg to sit for a while and bleed off most of the gas before doing a test pour. Repeat if necessary.

Others find that setting the PSI to 40-50 prevents any backflow and the beer is shaken with the gas line at the bottom. This method has the benefit of listening for bubbles as CO2 enters the beer. The idea is to lower the pressure by 2-5 PSI each time the bubbles stop, then continue rocking the keg so the bubbles start again as the gas present goes into solution. Once the PSI on the regulator is around 20, the target pressure desired should be pretty close and near a good level of carbonation for serving.

I'm over carbonated... what happened??!!

Both of these methods can lead to over carbonation and the beer must be tasted periodically to insure this doesn't happen. If it does, the solution is simple but can take time to solve.

Disconnect the gas and pull the pressure release value until the hissing stops. CO2 will come out of solution to re-pressurize the head space and be removed from the beer. Do this again every few hours until the desired volume is reached.
2 Comments

Barleywine is headed to the NHC!

3/21/2013

0 Comments

 
Picture
I submitted one beer to the National Homebrew Competition this year and it was an American Barleywine called "Hard Target".

We've posted a few things about this beer in the past and if you missed it, the recipe and fermentation notes will bring you up to speed.

One of the more interesting things about this beer was recorded in our "Add Oak And Bourbon To Keg" article where it was warm aged on oak and bourbon for almost a year. I was happy to find that the nylon bag held up quite well during this time. There was no deterioration at all and the stainless steel link chain was perfectly clean after running under water. The oak chips also showed very little wear.

I'm extremely pleased with how this beer turned out and can't wait to see the NHC judging notes. I'll be sure to post up the score sheets when they come back (good or bad!).

Eiswine say what??

On a side note, I fermented this beer in two 5 gallon carboys and they finished a bit differently. One of the carboys (the one I submitted) attenuated a little more and has a smoother, dry character. The second fermenter produced a sweeter version and, although some people would prefer it for the style, we ultimately decided that smoother was better.

Why did I mention this? Well, I have 4 gallons left of the slightly-sweet barleywine that may be a great candidate for a freezing process that concentrates alcohol and flavor. This process is typically used to create the strongest member of the bock family called an "Eisbock". 

Eisbock, which is German for "icebock", is made by freezing the beer into a slushy consistancy, effectively removing water from the beer. As it concentrates, the bitterness, final gravity and color are all boosted.

I'm freezing a test sample soon, just to be sure it works for this beer. I'll try to post a write-up of the sample tasting and definitely the full process if we do it.

p.s.  My buddy Scoundrel submitted 3 beers this year and I certainly wish him luck and hope his beers find the second round!

Gooooo BREWGEEKS!

Cheers!

TK
0 Comments

MalFet's Bottle Washer

3/18/2013

5 Comments

 
Picture
When I first laid eyes on MalFet's bottle washer I thought, what is this fascinating invention he created?

Is it some kind of medieval torture device.. or perhaps the latest and greatest NYPD road spike strip? Oooh, how about a blow dart machine gun?

Bigfoot's hairbrush??!

Umm, No. It's actually a very cleverly conceived bottle washer that hooks up to a submersible pump and sits over the sink or wash basin.

Here are a few details as described by MalFet along with a video and link to the parts list and full article. Any questions about it can be asked via the "Original Link" at the end of the post.

"It's a very simple concept, but it can wash, rinse, and sanitize 30 bottles with virtually no effort. I built a frame out of 1/2" cpvc fit to a standard rectangular milk crate, used 1/4" copper refrigerator coil for the vertical bottle spouts, and push water through it with a 1/4 HP submersible pump. The pump sits in my sink filled with whatever I want to wash with (pbw->rinse water->star san), and the milk crate rests right on top of it.

I made three of them since I always bottle two ~4.5 gallon batches at a time, and washing those 90 bottles is now trivial. I fill the sink with PBW, let it run on each crate for 5-10 minutes, drain the sink, fill the sink with star-san, and then run it again for a minute or two. My active time for 90 bottles is probably somewhere in the neighborhood of 5 minutes. It's so painfully easy that I kind of hate myself for only doing this now after all these years.

I get plenty of power from this pump, and without the bottles to block it the stream of water coming out extends 3-4 feet above the spouts. I ran through a batch of very grimy, dried out bottles and they came out completely clean after 15min of PBW. If I built it again, I might actually use copper for the frame and sweat it all together. The JB Weld holds reasonably well, but in knocking the washer around a bit a few have come loose. They still work perfectly fine even when loose, but welded metal would obviously be more durable over the long run."

[Read More]

5 Comments

Happy Belated Birthday BrewGeeks!

3/13/2013

0 Comments

 
Picture
HA-PPY BIRTH-DAY BREWGEEKS!

You are one year old!

Well, it's a little late... but as they say, just because I missed your birthday doesn't mean that you don't look like a monkey. Alright, maybe nobody says that.  O.o

I hope you have enjoyed reading BrewGeeks over the past year and, although there isn't much about our equipment and process that we haven't written about, we will continue to bring you DIY articles and beer information in the future. Articles could come slowly from time to time but such is life and the challenge of balancing work and play.

Cheers!

0 Comments

A Few Kegging Solutions from BrewGeeks!

2/25/2013

1 Comment

 
Picture
Problem: Regular (non-perlick) taps often stick when left unused for a few days.
Solution: Fill a small spray bottle with vodka or better yet, grain alcohol and spray the nozzle in the end of the tap. Hold a bar towel around the end of the nozzle to prevent dripping. 

Problem: Beer comes out foamy.
Solution: Pull the tap on quickly. This is the number one mistake patrons make at my home bar. If this doesn't work, perhaps the problem is larger. Be sure each tap line is at least 4-5 feet long (longer is preferred). Warm beer will foam more. Finally, serving pressure can normally be very low. I have four taps and my psi is always below 10 and typically set between 5-7. Inspect the liquid side poppet and replace or lube if necessary. 
 
Problem: Keg lid won't seal. 
Solution: Set your PSI to around 30 to "seat" the seal, then you can reduce it it whatever you like. Also be sure to lube the large o-ring with food grade keg lube. If you are still having trouble, try reversing the keg lid 180 degrees and see if that helps. Sometimes exchanging the lid with a different keg will do the trick. Finally, put a coin under one or both of lid arms to apply extra leverage to the seal. Spray some starsan around the o-ring or submerge in a tub to confirm it holds pressure.

Problem: How much beer is in my keg?
Solution: Weigh the keg. A gallon weighs 8.34lbs so that puts a full keg at approx 51lbs factoring in 8.5lbs for the weight of the keg. This works out nicely because there are 52 beers in a keg.

Another solution is to put a temp sensitive strip on the side of the keg which will show you the approx beer level. Moving a keg from cold to room temp will show a condensation line after a few minutes also showing the level. In-line flow meters are another great option albeit expensive.

Problem: CO2 regulator PSI rises slowly over a few days.
Solution: This usually means one or more of the kegs contain beer that is over carbonated--even if only slightly. Be sure to bleed off all the shared head space to be sure the set PSI is maintained. Periodic bleeding may also be necessary.

Problem: How can I bottle from the tap?
Solution: It's easier than you think! First, the beer should be as cold as possible and you should spray and empty each bottle with sanitizer to reduce foaming. Next, set the PSI at the regulator very low (around 2-3) and bleed all the CO2 from the keg to be used.

Alternatively, you can remove the gas side ball lock from the keg and bleed the CO2 until the hissing sound begins to diminish. At this point, there's usually enough CO2 to fill a 22oz or 2-12 oz bottle. It also helps to considerably reduce foaming.

If you have a way to blow a burst of CO2 into the bottle before filling, this will reduce oxygen contacting the beer. Finally, place the end of bottle over the tap and pull the tap handle on very quickly being careful not to overfill. A cobra/picnic tap will also work using the same method.

Related Articles:
Clean Corny Kegs
Rack Beer to a Keg
Organize Keg Supplies
1 Comment

100 Home Brewing Tips

2/22/2013

0 Comments

 
Picture
Not 99, not 101, but 100 Homebrewing tips are ready for the downloading if you have a kindle or kindle app for iOS (regularly $6.99).

Can't vouch for the content but hey, it's free!

Check it out here.


0 Comments

Hop Character Chart

2/21/2013

0 Comments

 
Intuition Ale Works posted a nice hop character chart on their facebook page.  Check it out below and head over to their site to see what else they have going on.
Picture
0 Comments

r8rphan's Wort Splitter

2/20/2013

0 Comments

 
Picture
Here's an idea and project from r8rphan that takes the headache out of splitting up that 10 gallon batch into two carboys!

"I split the output of my CFC into a Tee that goes to the two carboys so they can both be filled simultaneously.... And since for whatever reason, the flow was 'never' equal, I had to sit there for 15 minutes manually pinching the tubes to keep them filling at the same rate.... PITA, hand cramps, etc..

So I made this little doo-hickey that allows me to use a couple 3/8" ball valves.. and then becomes a storage carrier for itself when not in use...

Used it for the first time yesterday, and it is just one of those things that makes brew day a little easier."

[Read More]

0 Comments

PEW PEW... You Know You Want One

2/1/2013

1 Comment

 
Picture
I can barely count the times I've gone to open a bottle of homebrew and wished I had a real .50 cal bullet to open it with.

If you feel the same way, head over to ThinkGeek and pick one up!

Actually, it's most useful for the braggart friend who constantly gets head shots in Black Ops 2.  Open his next beer with this and win for life!

1 Comment

Chart of the Week - Beer Pong

1/30/2013

0 Comments

 
Okay, first I'm going to admit that I've never played beer pong with homebrew, mostly because I imagine there should be a law against it.

Wait a minute, on second thought, what better way to get rid of that test batch you brewed that went horribly wrong??
Picture
Thanks to infographiclist.com for the graphic
0 Comments
<<Previous
Forward>>

    Thanks for visiting BrewGeeks!

    This site is dedicated to sharing information about homebrewing and beer. We hope you find something here that helps your brew day go a little more smoothly.

    If you like our site, please help spread the word. We really appreciate it!

    Cheers!


    Popular Articles

    Make Starters
    Grow Hops
    Dry Hop
    Track Your Beer
    Clean & Sanitize
    Carbonator Cap 

    Have Feedback or Suggestions?
    Contact Us

    Archives

    January 2022
    November 2015
    September 2015
    August 2015
    July 2015
    June 2015
    October 2013
    July 2013
    June 2013
    May 2013
    April 2013
    March 2013
    February 2013
    January 2013
    December 2012
    November 2012
    October 2012
    September 2012
    August 2012
    July 2012
    June 2012
    May 2012
    April 2012
    March 2012
    February 2012

    Categories

    All


    [ Powered by Yeast ]
Powered by Create your own unique website with customizable templates.